
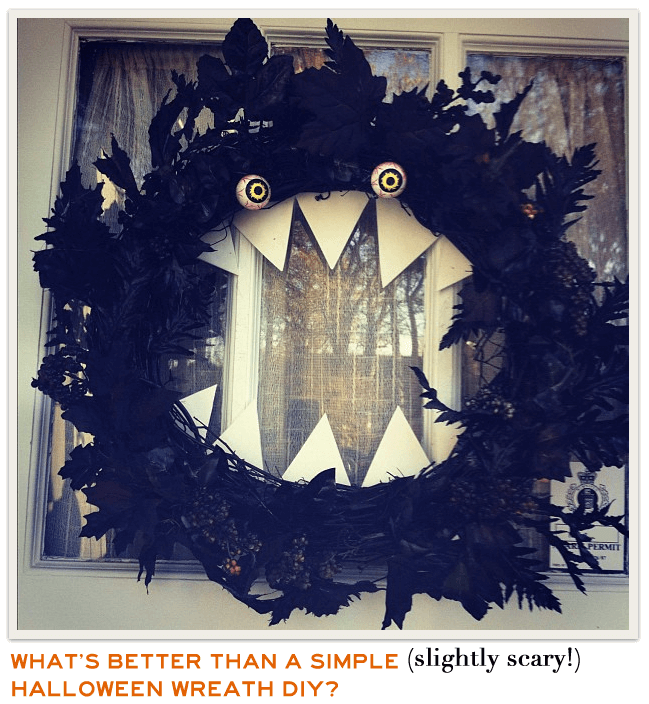
There are plenty of cute Halloween wreath tutorials online and if that's what you're looking for, please turn back to Pinterest right now. For you braver souls, I'd like to introduce you to someone I bumped into at my Mother in Law's house last weekend:

It was inspired by a wreath with icicle teeth that my mother in law saw at the Halloween version of Disney's Haunted Mansion, but with jagged teeth made from foam her version makes up in attitude what it might lack in subtlety. And then some.
This wreath is gleefully deranged. It will eat any candy left unattended near the door, and it's not to be trusted. With one look it's clear what will happen when trick comes to treat if this wreath has anything to say about it, and quite frankly you don't have the appropriate permits.
I hope you bring him to your neighborhood this Halloween :)
Grab…
- A basic wreath with as much or as little decoration as you like (Tip: Larger wreaths with more space in the center make a larger gaping maw for you to fill with teeth)
- Black spray paint
- Two googly eyes (bloodshot Halloween eyes are available at dollar stores, or you can add red permanent marker lines to a normal pair)
- 1-3 white craft foam sheets
- Hot glue gun
- Scissors
Okay!
1. Take a plain wreath, with as much or little seasonal decoration as you like. For a more feathered, frayed look as shown focus on adding larger pieces (such as leaves) close to the outer edges. This is the base that we'll build on once it's painted.
2. Coat the wreath lightly in black spray paint and let dry, repeating if necessary until it's as black as your Halloween heart. Alternately, if your heart isn't black at Halloween because you love giving candy to the parents of babies in onesie costumes (let's be real) repeat until the paint coverage is even and thorough.
3. When the wreath has dried, bring it inside to use for size reference while you cut the teeth. Trace long acute triangles (like this) onto the back of the white foam pieces. Aim for the largest teeth to take up approximately one third of the height available in the “mouth” space. Cut when the desired shape has been lightly traced, and re-trace as necessary until you're confidence. No one looks at the back of wreaths!
Note: To match the toothiness wreath pictured you need 4 small to medium sized triangles (these will be the outer corner teeth) and 6 medium to large triangles (these are the inner three teeth on the top & bottom of the mouth).
4. Make sure your wreath is face down on a flat surface, and hot glue the teeth into position with any reference pencil marks facing you. If you're not confident about the tooth placement you've chosen, try marking them with sticky tack or masking tape.
5. Use a hot glue gun to attach the googly eyes to the front of the wreath. Be sure to test multiple placement options & stand back to see the effect from a distance. Remember, subtlety is not your friend & this is a good chance to go for personality points.
6. Enjoy making an impression on your guests!
Big thank you to my mother in law Sally for dreaming this up & giving me permission to share it here :)
LAST UPDATED ON: October 17th, 2012
CATEGORY: All Posts
I love this idea! I am in dire need of a fall wreath (realizing yes, that fall is I suppose coming to a quick end in a few weeks) and I can’t find one anywhere I like. I must find one on pinterest to make it happen.
As for Halloween decs, I have Minnie and Mickey dressed in costumes on my front door/windows. So classy, no? But they make me smile when I see them and hopefully the kids in the neighborhood will realize that the new folks on the block are totally up for trick or treaters :) Now here’s hoping my five bags of candy is enough…
That is so cool. I would totally put that up. I really think it’s fantastic.
Kacie
Ahhh, that one’s kind of spooky! I just love it!
I love this wreath so much! I really wish South Africans were more into Halloween because I would totally put one on my door:)
That wreath is truly terrifying!
I turned the corner, saw it for the first time and burst out laughing. It honestly looks like something that might appear to Hunter S. Thompson in a vision, and yet there it is on my MIL’s door! ;)
Hunter S. Thompson vision, what a perfect way of describing that aesthetic!
Luke thinks this is the best ever! We’re going to make one. Thank you Sally for making it and thanks Kyla for sharing it with us!
I love that Luke & I are on the same wavelength about this! I hoped it might appeal to the horror lovers in your family, and it has little boy appeal written all over it :)
i love this project :)
Since the weekend I put a black curtain behind the wreath- it makes the teeth pop even more!