

I love getting organized and when it comes to planners, daytimers, agendas – whatever you call them, I'm a sucker for a great system that will keep me motivated through the week. Inventing my system is the most fun for me. While I've posted a DIY planner tutorial that I used to make my 2011 planner, the problem with making a planner for yourself that will last you a year is that you have to bind it yourself and make it durable enough to last a long time. That's a big stumbling block for many people, so when I made my 2012 planner I wanted to come up with an approach that more of you could try for yourselves :)
This tutorial will show you how to take a Moleskine Notebook and turn it into a weekly & monthly view planner that you can start at any time of the year, and need almost no supplies to make! This DIY Moleskine planner is completely customizable and uses every last page of the notebook, but each week is infinitely flexible, so you can naturally change how you use it over time, and let your planner evolve as your year unfolds.
Supplies
- A Classic Extra Large Moleskine Notebook (I used the squared, softcover version)
- A Pen
- A Ruler
- Optional: determination & a distraction, tracing the template takes a while!
What's Inside
Weekly Pages for the Day To Day

The weekly view pages are what makes up most of my DIY Moleskine planner. They have a large space for every day To Do lists, appointments, and projects that need to get done. Then above and below the weekly notes, there's lots of space for checklists, notes and anything that you'd like to add in! This extra space means that I can adapt how I use my planner as the year goes by so I'll never grow out of it or be locked into one system. I love how flexible it is!
A Monthly Calendar View Page & Blank Pages for Dreaming and Planning

At the end of every month, I added three double-wide pages. One is a monthly view page with a calendar layout for planning my projects, client plans, appointments and being able to see things in a slightly different layout. Then I have two more: one for brainstorming & dreaming (I call it dreamstorming for myself), and one for planning how I'm going to approach work with my design clients in the coming weeks.
How I Use My DIY Moleskine Planner


I use my weekly pages differently every week! Right now I'm using check marks for the things I need to get done every day, and I've added an extra line under the main section for what I'll be blogging about every day. I write my husband's travel in on washi tape for a pretty reminder of when I'll be a solo-puppy mama.
Above the weekdays I've made notes on fun projects I can work on in the evenings, and below the weeks sometimes I have the steps that I'm working on with my current clients (like above)…
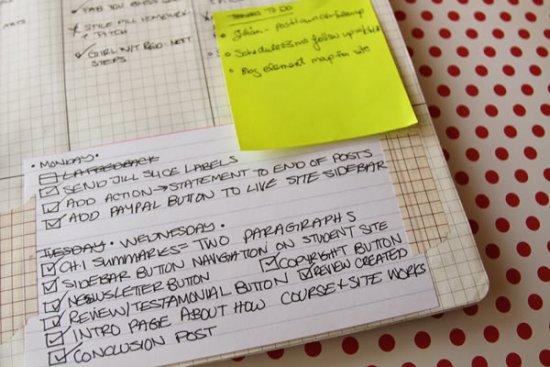
Sometimes I add in cue cards for special projects- like when I work on Planner Camp, online course that teaches you how to make your own day planner. Sometimes I'll add sticky notes that I can move forward from week to week.
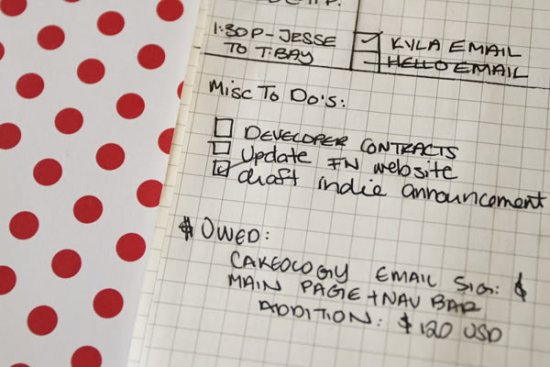
Then sometimes I'll make time lines or check boxes to keep track of clients I need to invoice or pieces of work I need to get done. This whole bottom section can be whatever I like it to be, and change as much as I need it to from week to week.
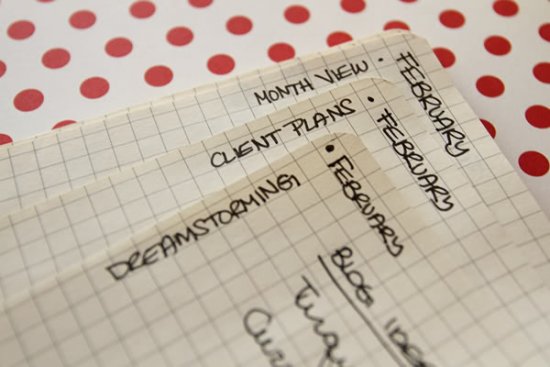
And of course, with the Month View, I can still plan with a big picture view of how each month will go, and I can stay on track of my goals and dreams throughout the year.
Steps To Make Your Own
1. Take your ruler & pen, and open your Classic Extra Large Moleskine Notebook to the second page, so you can see two pages opened up at the same time like in the photo under the “Weekly View” heading at the start of the post.
2. Consider where you would like your weekdays positioned vertically on the page- you can put them right at the top, so there's no space to write above them or place them in the middle of the page, whatever feels the most natural to you. When you've decided, draw a horizontal line all the way across both pages.
3. Consider how much vertical space you would like the weekdays to take up, and how much space you will need for each day. I strongly recommend leaving 2-3″ of space at the bottom of the page, so you can make a flexible system that will adapt as your year progresses. When you feel decided, add a second line that will form the bottom of the weekly area, across both open pages.
4. Create the divisions between the days of the week! My measurements make weekends more narrow than the weekdays:

Saturday & Sunday are 1 and 7/16ths of an inch wide

The weekdays are 2 and 3/8ths of an inch wide
5. Add the labels for the month and days of the week, and then move forward to repeat steps 1 – 5 again until the end of the month.
6. At the end of each month, leave some pages blank for tracking your goals and plans. I recommend leaving six individual sheets, or three pairs of pages that open up facing you together and then starting the weekly view pages again. These blank pages can be used for anything you like (or you can skip them and leave extra space for writing at the end of the year) but adding them in will allow for a perfect 13-month weekly calendar that has room for monthly brainstorming and tracking.
Thanks for following along!
I'd love to see how you take this idea and make it your own,
so if you use this as a planner make sure to link back to this post :)
LAST UPDATED ON: January 31st, 2012
CATEGORY: DIY Day Planner Design
Hey, Kyla! Great advises you have for all the planner lovers! As for me – being the real productivity geek, I’m using both – paper and digital tools to keep myself organised. My last strike it the paper planner which links directly to digital calendars. I hope it’ll solve my problems: constant conflicts between upcoming events and actually forgetting them without any alerts to remind me the time. These guys: http://kck.st/2dLmsIU keep me intrigued about my new planner. We’ll see how it works for me.
This post makes me happy. :)
Such a great idea! Thanks for sharing :)
I just bought the Moleskine notebook today, and I’m gathering supplies so that I can start one for 2015! I’ve gone through so many planners, and none of them work for me. But as a busy college student, I don’t have the time (or finances, really) available to build a planner completely from scratch! This gives me something to do on the long flight back to school this weekend. :)
Perfect! I hope you have fun with it on the flight back, Mikayla!
Hi Kyla!
I just wanted to let you know that in this week’s Creativity Round Up (Creative Planning For The New Year) I’ve included a reference to this page from your site!
The article goes live on Sunday morning at 10:00AM PST.
Thanks for posting such great content!
Thanks for including it, Deborah!
I see this is an old post but it is exactly what I am planning on doing for 2015. If I start on it now I can have it just the way I want it by the new year. I also find making my own fun. My question is…did you do a full month view on a 2 page spread or even a single page? If so, do you have an pictures showing that? I may have overlooked them. Thanks! Your blog is GREAT!
Your guidance was invaluable and I created my calendar from a Moleskine which had been stalled for years!
Thank you very much!
What an amazing concept. I love planners. I use them as calendars, and for special projects…even cookbooks! Using the large Moleskin brings an extra dimension to this obeys session:/project. That’ks! As soon as I can plow out if the latest Polar Vortex, I will get several!
This is a truly fantastic idea! I saw this on Pinterest about two months ago and pinned it without even thinking… I saw it again yesterday and picked up a Moleskine today! I changed some of the formatting to make it my own, but I’m so excited to use this and I also love the idea of “dreamstorming”! Congratulations on another spectacular idea! :)
I just made up 4 months to carry me through my new semester of school. Hopefully it’ll help me stay up on what I need to do. Took me two hours or so. I used a felt tipped sharpie pen. It worked out just fine. I used a large Tardis stamp to emboss the cover. ^_^
It made me happy and I had a good time, even though my hand was cramping by the time I was done.
Reply to Heather: LePen and Staedtler Triplus fine liner (felt) work wonderfully in the Moleskine notebooks. Staedtler is at Staples and LePen is harder to find but are regularly at Art stores like Utrecht.
Kyla: Thank you for sharing the DIY planner. I have struggled with a printed version and am currently using the large weekly with the lined page beside it. Liking it so far but you definitely inspired me to create my own.
Hi Kyla,
Thank you so much for sharing this idea: it’s what I was looking for :)
I’ve done my personal planner, a little smaller than your and you can find it here on my blog.
Silvia
http://www.laraccoltadisilvia.com/2013/01/lagenda-2013-fai-da-me.html
I have always had trouble finding a planner that works for me. I was doing research on making my own planner when I stumbled upon this tutuorial – it was love at first sight! It’s exactly what I was looking for – a weekly view with enough space for lots of daily detail and notes and loads of extra flexible space for all my lists. I have been using it for more than a month now and I am pretty sure this is the ONE ;D Thanks Kyla!!
Hi! I was just thinking of buying a planner for the school year when I stumbled upon this gem. I love it and can’t wait to make it! Just one question for you, what does the monthly view look like? Just like a calendar’s monthly view? Thanks!
Thanks! I was pretty pleased with myself for thinking of rotating the book, too. It’s the little things, I guess… :)
I did a little browsing last night, and I think I might switch to a Leuchtturm 1917 dotted book. I think the dots might be a good compromise between blank pages and all-out graph paper. Anyway, thanks for the inspiration!
I know this is a bit old, but just stumbled upon it. I do something similar with a blank notebook for a weekly customizable planner. I love the flexibility. Your use of graph paper is a great idea – so far I’ve been using blank pages, which makes it hard to draw perpendicular lines :) I also use ecosystem brand planners because from what I’ve read, moleskine uses a dubious plasticizer in their covers.
Another thing I do differently is that I turn the book sideways, so that my vertical week columns are above the book crease and my to do list/notes section is below the fold.
Anyway, just thought I’d share some thoughts for others thinking about doing a DIY planner. Thanks for your post!
Erin! I love your idea to turn the book sideways- that’s such a simple but ingenious change! Thank you for sharing :)
Found you via pinterest. This is the best pin/post EVER! I’ve tried four, yes FOUR, different planners/date books in the past year. None of them ever fit *me*. I’m practicing with a quad ruled comp book right now. I love having extra blank pages at the end of the months!!
Thanks for sharing your pen suggestion. I’ve found that the new Sharpie Fine Writing Pens work well also.
Thanks so much for sharing this – just made my own and it’s already improving my life soooo much!
Thanks so much!
I just ordered the Moleskine and the pens…can’t wait to try this. Kyla, do you have a photo of the monthly layout you can show, or the measurements for it?
Hi Jennifer! For the monthly view I’ve been winging it so far, and I don’t have a system that I love yet. What I do is approximate the measurements by counting out the squares for the height and width of the calendar I’m drawing, and dividing them by the number of days in the week or weeks in the month. I’ve done two page versions and one page versions that have worked out that way :)
I totally did this tutorial and I love my planner! Thank you so much for posting about it :)
Hi Kyla! I’ve been trying to find a planner that will work for me and I was overjoyed when I stumbled upon your blog and found this tutorial. I just had a quick question though. What are the dimensions for your monthly calendars after the weekly schedules? Could you submit of picture of your own planner with the calendar page please?
Thank you! :D
This is way to much work! You are re-inventing the wheel here. Get a planner. Plan.
That sounds like good advice for you. For me, as a planning geek, customizing my own planning was lots of fun. I made my own from scratch last year so this was another way to explore that idea. If you’re not into crocheting, the idea of crocheting a blanket sounds inane when there are blankets out in stores to be purchased- and yet the handmade community persists! ;)
Actually, I both crochet and knit. If I was drawing a planner, I wouldn’t have the time. I also roller blade, raise a child, work, sing in a chorus, work for political candidates, read, write, garden, meditate, bike and play the cello in a chamber group. On the side, I have a design business. To coordinate all of this, I use my gadgets. To each their own.
Yep! Everyone only has so many hours in the day & it’s up to us to choose how we spend our time. Since organization is a big passion of mine, this was a really relaxing & fun project for me. I’m happy to have shared it, and am really glad that a lot of people thought it was neat & hope that there’s something else on my site for you to enjoy :)
Love this planner! Acutally, love your whole blog! Stumbled upon it recently (thanks Pinterest!) And I love it!
This is really fantastic! I’m gathering my supplies to make this but I’m new to the world of Moleskine, are there any pens that you’ve found work best with the paper and any you’d avoid? (Preferably none that leak through.)
Yes! This is a tricky thing with their paper. I’ve found that gel pens don’t bleed through the paper, but they smudge like crazy for a long time after you’d think they would be dry. I’ve switched to a set of drawing pens that I have, called Pilot Drawing Pens that have pigment ink (this is the exact type I use) and they dry almost instantly and don’t smudge. They work beautifully on Moleskine paper, and I think I got them just at an office supply store with the art supplies. Hope that helps :)
I, too, have used a Moleskine monthly and weekly date book. I have always used the 5 x 8 size, but this year went for the big daily one. I like to tape things in it and draw in it and stuff, but Im really liking this one with the graph paper! Might be the route I go next year! Thanks for the tutorial.
That is so impressive and useful!!!!! It’s so me too! I’ll get down to work. Thanks for sharing!
Man I wish I was as organized as you. >.<
I'm so bad at checking things off a list.
OMG! I love this… im hyper organized and always having to organize my life and conforming to what type of planner i buy that year but this is a very cool idea to make my planner work for me! Thanks so much… love your blog btw!
That is amazing! I love organization, but I’m so bad at keeping up with it. I definitely need it. Thanks for this AMAZING idea :)
FANTASTIC IDEA ! ! ! <3 GREETINGS FROM POLAND, PLEASE CHECK OUT OUR FIRST BLOG :
ONELOVEONEDNA.BLOGSPOT.COM
ONELOVEONEDNA.BLOGSPOT.COM
ONELOVEONEDNA.BLOGSPOT.COM
I think this may be the answer to the fact that I can never find the *perfect* planner. I’m currently using a Moleskine daily view one which is good but bulky.
Thanks Sam, I’m glad you enjoyed it! :) I’ve used the Moleskine planners before, and they’re great- I especially liked the weekly version that has a blank page next to it, but I couldn’t stick with it because it still felt hemmed in. Somehow this horizontal version feels much more flexible & customizable, and the breaks between months have been really helpful for me too.
Yeah, I don’t like feeling hemmed in either with my planners. I need space to be able to do something different week-to-week if need be.
Thanks so much for sharing your planner with us, Kyla. It’s pretty motivating to make a ton more lists (not that I really need to since I’m a list addict, haha). xo
I love that your planner is completely hand written! I have tried a million ways to keep up with a planner/to do list system and I have finally realized that hand written to do list items get accomplished faster than typed lists! I have no idea why, but its true! Thanks for sharing your tutorial! I love it!
I’m not a big notebook DIY fan but I really like this one!
And I thought I was the only one who added index cards to their organizers! So great for adding notes!
Thanks for posting this. Although, I do wish I had seen it before I bought a Moleskine planner! I will have to keep this in mind for next year. :-)
Holy crap Kyla! (excuse my language) This is awesome. I’ve actually been fretting about my planner since nothing purchasable works for me and i’ve never quite been able to “hack my own version. This is so good, I’m going to try it right now.
This is FANTASTIC. I have a planner already this year, but this makes me excited to be a bit more crafty and do my own next year. Love!
I think I prefer your last year’s planner, if only because it was printed. I would totally dig this Moleskin one, but sadly my handwriting is NOT as good as yours! You make everything look good, Kyla.
This is great! I love my Erin Condren planner but this is a nice DIY alternative. I may have to give it a shot next year.
Ah! this is so great, I keep a moleskine by my side all day with a long to-do list. I think I might have to start turning it into a planner like this, too!!
Well that’s kind of awesome.
I really need a system.
Erin Condren’s peeps told me they’re developing a life planner for men that will be out in the spring. But I have so many things I want to do before then. (Total Global Domination takes time.)
hahaha
I’ve been absolutely obsessed with the idea of a DIY planner ever since you posted the template some months ago. I truly appreciate you giving us such detail and loads of ideas. I’ve been drafting my ideas for awhile and can’t wait to jump into InDesign tomorrow and map it all out! Thanks Kyla!
I love (love, love, LOVE!) planners so I was really excited to see your link to this post pop up in my twitter feed :) I’m not remotely crafty but even I can handle measuring with a ruler! I think I’m going to try to make one of these for my business :D
Holy Crap if i was that organize, i would rule the world.