

Instagram photos are great, but when you have a blog or website and want to grow your readership, at some point you'll probably want to go a step further and stretch your creative muscles.
Photo editing software can be expensive, but there are other options that can help you to transform your photos into beautiful art for your website. You just need to know where to look.
That's where we can help!
The web-based application Pixlr: Editor is a free photo-editing program that can help you with all of your basic editing needs. Pixlr's editor combines paint tools, image design and adjustment features to allow a “lite” version that can stand up against Photoshop for most blogger's daily needs.
Today we'll focus on taking a photograph that might look a little drab, and making it really pop with just a few clicks. We'll also look at how you can re-size images to make them fit the width of your blog exactly – which makes your site load faster for readers.
So let's get down to business and learn the basics of image editing, using the free web app Pixlr: Editor!
Adjust Brightness & Contrast to Make Your Photos Pop
One of the simplest ways to help your photography come to life is to adjust the how the colours are displayed in the image. There are many ways to do this, but the most straight forward is to use the Brightness and Contrast tool.
Try It Out:
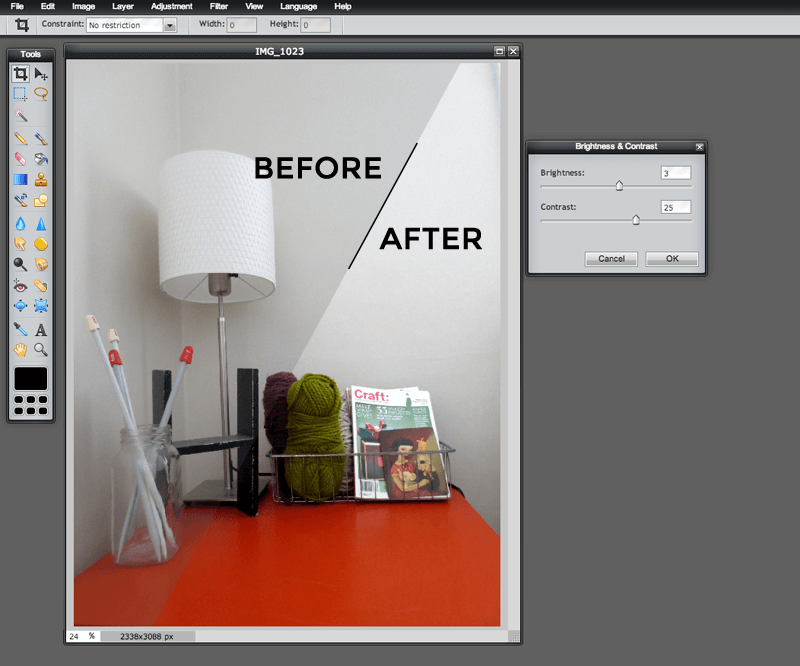
1. Click “Adjustment” in the menu of the Pixlr Editor, then click “Brightness and Contrast”
2. Adjust the sliders and watch the image change as you do. The goal isn't to make it perfect, and you want to make sure you don't make the effect too severe either. Add a little more brightness (slide to the right, into the positive numbers) if the image is dark, or remove brightness if the image is too bright, and then add a little contrast.
3. Click OK! Subtle changes can make a dramatic impact here, take a look above!
Skip the Headache!
Your monitor has a huge impact on way you see images on your device. Before making any adjustments, double check that your monitor brightness is high so you're not adjusting the image for darkness that's not really there. There are also great tools out there for adjusting your monitor's colour settings if you want to get fancy, just use your google-fu! (It's like kung-fu, only geekier.)
Fine Tune with Hue and Saturation Adjustments
Sometimes the time of day or strongest colour in a room can make your images look like they have a colour tone washed over them. Other times, a colour that's vibrant in real life looks flat and dull once you look at the picture!
Hue and saturation adjustments are here to help. This is an area where you want to keep your adjustments very small, or your image can start to look neon or cartoonish. Remember that we want to make your images come alive, so they engage blog readers. If you err on the side of radioactive colours? That's just distracting.
Try It Out:
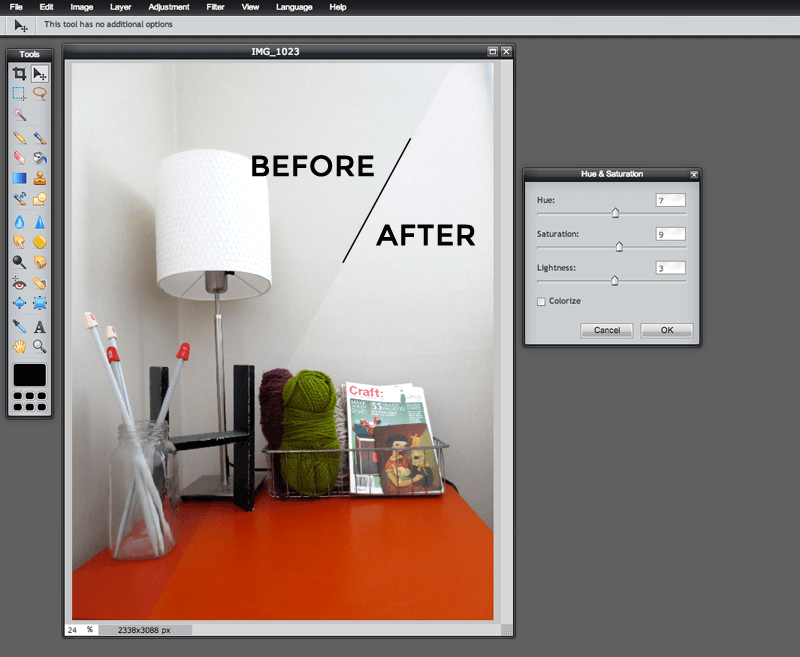
1. Click “Adjustment” in the menu of the Pixlr Editor, then click “Hue and Saturation”
2. Play with the sliders by dragging them to each extreme, and then setting them back to zero so you understand the kind of adjustment each will make. You'll never use tools you don't understand, right? You're not going to hurt your image by exploring them. Scout's honour.
Quick Reference:
- Hue changes the overall colour tone of the image. Dramatically! This one will make you smile when you change it for the first time. (Remember, setting it back to zero is your get out of jail free card.)
- Saturation will increase or decrease the depth and vividness of your image's colours.
- Lightness will pull the image's tones closer to or farther away from black.
3. Make subtle adjustments to the sliders, until the image looks slightly more realistic.
4. Click OK!
Resize an image to fit your blog's content column
This is an important step that many new bloggers and website owners forget: if you upload large images into your posts, it will take much longer for them to load for your readers.
This wastes mobile data for people viewing your images on the go, and adds a delay to your readers viewing your great work. And if they're somewhere with slow internet? It increases the chance that you'll fall off their “Must Read” list.
Luckily, there are easy to use, visual tools that make this easy to fix:
How to Find Your Blog's Column Width:
1. Determine which web browser you are using. Common browsers are Google Chrome, Firefox, Safari and Explorer.
2. Download one of these tools:
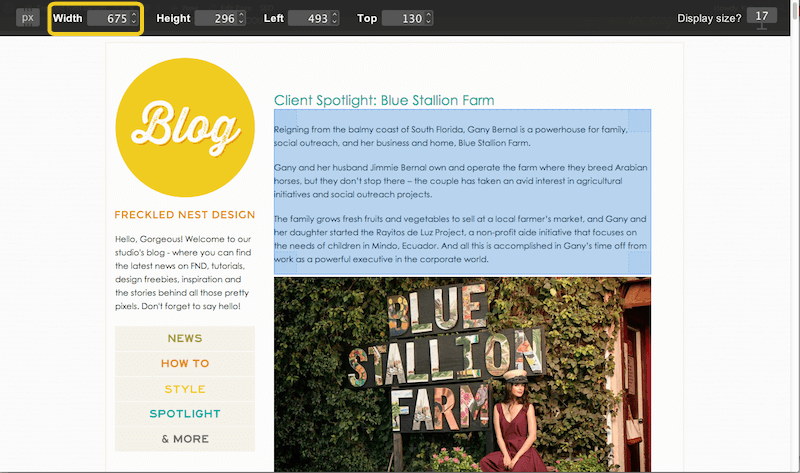
Google Chrome: Ruul (shown above), MeasureIt, Page Ruler
Firefox: MeasureIt, Pixel Zoomer
Safari: MeasureIt
Internet Explorer: Pixel Ruler, A Ruler for Windows
3. Follow the instructions for installing your measuring tool of choice, and learn how to turn it on and off. There will be documentation on the links above on how to set up and use it. You've got this!
4. Go to your blog or website, and look for a good place to measure. Images that fit well in your site already are a great place to take a reliable measurement. Measure from the far left edge of your content to the far right.
5. Look for the number value by the word width. (see image above, in the yellow rectangle)
6. Round that number up or down. Most web designers will not give you a column that's 552 pixels wide, they'll round it up or down to the nearest 5 (either 550 or 555). If you're getting an odd number it's possible that it's correct, but make sure your ruler wasn't slightly out of place when you took the measurement. Make a judgement about your content width number that feels right to you, and remember that adding images that are 5 pixels too large isn't going to break your theme or slow your reader down. Better to be a little wider than having images that don't fill up the whole space.
7. Write down the width of your content column. This is the size you'll want to re-size images to!
Need Blogging Help?
In part two of this series we'll go over the basics of cropping and re-sizing images, adding text to images, and how to create a collage.
What problems do you have when you're blogging? Are there any tools or tutorials you'd love to see? We're all ears!
LAST UPDATED ON: May 14th, 2014
CATEGORY: Content Marketing Strategy
Hi,
Actually I’m looking for tutorial on how to change blog post sub item to fancy fonts.
E.g: Like this post in your blog,how you change “Skip the Headache!” font.
I hope my message is clear :p Thanks in advance.
What a great tutorial! I’m a photographer, but I love how simple and straightforward this is. I’ll definitely be sending this along to my friends. :D
Thanks Meg! I love making tutorials for clients, so I thought I should bring it to the blog! I’m going to be covering all kinds of basics here and then moving into marketing, SEO and anything else readers request. If there’s anything that frustrates you about blogging, or that you’d like help with just let me know!
Actually… there is some things that frustrate me about blogging…. seo. So I’m glad you have an upcoming post about it. Oh.. and is there an “easy” way to make my blog mobile friendly?
Yes! SEO is such a big topic, and I actually love it so I’m excited to bring clarity and enthusiasm to the topic. For making your blog mobile friendly, there are easy ways to do that, especially if you’re on WordPress.org (which it looks like you are). There are plugins that you can install on your WordPress blog for free that will make your site mobile friendly, and give you access to basic options that are easy to control. One of my favourite plugins for this has been around for a long time, and it’s called WPtouch Mobile. There are installation instructions on the site, and if you need help our developers are always able to swoop in and do hourly support for that kind of work! You can email us about it at hello@frecklednest.com to get an estimate if you need a back up plan :)
That was just what I needed. Thanks! Will be looking for part 2. I’m looking to add lines, arrows and caption to an image of a movement exercise to make the reader see the difference between correct and incorrect form.
Thanks! Mara
Glad it helped, Mara! We’ll be covering all that in the next part of the series. If you have any other blogging questions or roadblocks that you run into, let me know. I’d love to cover them in a post :)
Oh thank you, Kyla! I will be looking for it!